Codeausführung#
In diesem Abschnitt untersuchen wir die Erstellung benutzerdefinierter Agenten zur Handhabung von Codeerstellung und -ausführung. Diese Aufgaben können mit den bereitgestellten Agentenimplementierungen erledigt werden, die Sie hier finden: AssistantAgent(), CodeExecutorAgent(); dieser Leitfaden zeigt Ihnen jedoch, wie Sie benutzerdefinierte, leichtgewichtige Agenten implementieren können, die deren Funktionalität ersetzen. Dieses einfache Beispiel implementiert zwei Agenten, die einen Plot der Aktienrenditen von Tesla und Nvidia erstellen.
Wir definieren zuerst die Agentenklassen und ihre jeweiligen Verfahren zur Nachrichtenverarbeitung. Wir erstellen zwei Agentenklassen: Assistant und Executor. Der Assistant-Agent schreibt Code und der Executor-Agent führt den Code aus. Wir erstellen außerdem eine Message-Datenklasse, die die zwischen den Agenten übergebenen Nachrichten definiert.
Achtung
Der in diesem Beispiel generierte Code wird innerhalb eines Docker-Containers ausgeführt. Stellen Sie bitte sicher, dass Docker installiert ist und läuft, bevor Sie das Beispiel ausführen. Lokale Codeausführung ist verfügbar (LocalCommandLineCodeExecutor), wird jedoch aufgrund des Risikos, LLM-generierten Code in Ihrer lokalen Umgebung auszuführen, nicht empfohlen.
import re
from dataclasses import dataclass
from typing import List

from autogen_core import DefaultTopicId, MessageContext, RoutedAgent, default_subscription, message_handler
from autogen_core.code_executor import CodeBlock, CodeExecutor
from autogen_core.models import (
    AssistantMessage,
    ChatCompletionClient,
    LLMMessage,
    SystemMessage,
    UserMessage,
)


@dataclass
class Message:
    content: str


@default_subscription
class Assistant(RoutedAgent):
    def __init__(self, model_client: ChatCompletionClient) -> None:
        super().__init__("An assistant agent.")
        self._model_client = model_client
        self._chat_history: List[LLMMessage] = [
            SystemMessage(
                content="""Write Python script in markdown block, and it will be executed.
Always save figures to file in the current directory. Do not use plt.show(). All code required to complete this task must be contained within a single response.""",
            )
        ]

    @message_handler
    async def handle_message(self, message: Message, ctx: MessageContext) -> None:
        self._chat_history.append(UserMessage(content=message.content, source="user"))
        result = await self._model_client.create(self._chat_history)
        print(f"\n{'-'*80}\nAssistant:\n{result.content}")
        self._chat_history.append(AssistantMessage(content=result.content, source="assistant"))  # type: ignore
        await self.publish_message(Message(content=result.content), DefaultTopicId())  # type: ignore


def extract_markdown_code_blocks(markdown_text: str) -> List[CodeBlock]:
    pattern = re.compile(r"```(?:\s*([\w\+\-]+))?\n([\s\S]*?)```")
    matches = pattern.findall(markdown_text)
    code_blocks: List[CodeBlock] = []
    for match in matches:
        language = match[0].strip() if match[0] else ""
        code_content = match[1]
        code_blocks.append(CodeBlock(code=code_content, language=language))
    return code_blocks


@default_subscription
class Executor(RoutedAgent):
    def __init__(self, code_executor: CodeExecutor) -> None:
        super().__init__("An executor agent.")
        self._code_executor = code_executor

    @message_handler
    async def handle_message(self, message: Message, ctx: MessageContext) -> None:
        code_blocks = extract_markdown_code_blocks(message.content)
        if code_blocks:
            result = await self._code_executor.execute_code_blocks(
                code_blocks, cancellation_token=ctx.cancellation_token
            )
            print(f"\n{'-'*80}\nExecutor:\n{result.output}")
            await self.publish_message(Message(content=result.output), DefaultTopicId())
Sie haben vielleicht schon bemerkt, dass die Logik der Agenten, sei es die Verwendung eines Modells oder eines Code-Executors, vollständig von der Art und Weise entkoppelt ist, wie Nachrichten zugestellt werden. Das ist die Kernidee: Das Framework stellt eine Kommunikationsinfrastruktur bereit, und die Agenten sind für ihre eigene Logik verantwortlich. Wir nennen die Kommunikationsinfrastruktur **Agent Runtime**.
Die Agent Runtime ist ein Schlüsselkonzept dieses Frameworks. Neben der Zustellung von Nachrichten verwaltet sie auch den Lebenszyklus der Agenten. Daher werden die Agenten von der Runtime erstellt.
Der folgende Code zeigt, wie Agenten mit SingleThreadedAgentRuntime, einer lokalen eingebetteten Agent-Runtime-Implementierung, registriert und ausgeführt werden.
import tempfile

from autogen_core import SingleThreadedAgentRuntime
from autogen_ext.code_executors.docker import DockerCommandLineCodeExecutor
from autogen_ext.models.openai import OpenAIChatCompletionClient

work_dir = tempfile.mkdtemp()

# Create an local embedded runtime.
runtime = SingleThreadedAgentRuntime()

async with DockerCommandLineCodeExecutor(work_dir=work_dir) as executor:  # type: ignore[syntax]
    # Register the assistant and executor agents by providing
    # their agent types, the factory functions for creating instance and subscriptions.
    model_client = OpenAIChatCompletionClient(
        model="gpt-4o",
        # api_key="YOUR_API_KEY"
    )
    await Assistant.register(
        runtime,
        "assistant",
        lambda: Assistant(model_client=model_client),
    )
    await Executor.register(runtime, "executor", lambda: Executor(executor))

    # Start the runtime and publish a message to the assistant.
    runtime.start()
    await runtime.publish_message(
        Message("Create a plot of NVIDA vs TSLA stock returns YTD from 2024-01-01."), DefaultTopicId()
    )

    # Wait for the runtime to stop when idle.
    await runtime.stop_when_idle()
    # Close the connection to the model client.
    await model_client.close()
--------------------------------------------------------------------------------
Assistant:
```python
import pandas as pd
import numpy as np
import matplotlib.pyplot as plt
import yfinance as yf

# Define the ticker symbols for NVIDIA and Tesla
tickers = ['NVDA', 'TSLA']

# Download the stock data from Yahoo Finance starting from 2024-01-01
start_date = '2024-01-01'
end_date = pd.to_datetime('today').strftime('%Y-%m-%d')

# Download the adjusted closing prices
stock_data = yf.download(tickers, start=start_date, end=end_date)['Adj Close']

# Calculate the daily returns
returns = stock_data.pct_change().dropna()

# Plot the cumulative returns for each stock
cumulative_returns = (1 + returns).cumprod()

plt.figure(figsize=(10, 6))
plt.plot(cumulative_returns.index, cumulative_returns['NVDA'], label='NVIDIA', color='green')
plt.plot(cumulative_returns.index, cumulative_returns['TSLA'], label='Tesla', color='red')
plt.title('NVIDIA vs Tesla Stock Returns YTD (2024)')
plt.xlabel('Date')
plt.ylabel('Cumulative Return')
plt.legend()
plt.grid(True)
plt.tight_layout()

# Save the plot to a file
plt.savefig('nvidia_vs_tesla_ytd_returns.png')
```

--------------------------------------------------------------------------------
Executor:
Traceback (most recent call last):
  File "/workspace/tmp_code_fd7395dcad4fbb74d40c981411db604e78e1a17783ca1fab3aaec34ff2c3fdf0.python", line 1, in <module>
    import pandas as pd
ModuleNotFoundError: No module named 'pandas'


--------------------------------------------------------------------------------
Assistant:
It seems like the necessary libraries are not available in your environment. However, since I can't install packages or check the environment directly from here, you'll need to make sure that the appropriate packages are installed in your working environment. Once the modules are available, the script provided will execute properly.

Here's how you can install the required packages using pip (make sure to run these commands in your terminal or command prompt):

```bash
pip install pandas matplotlib yfinance
```

Let me provide you the script again for reference:

```python
import pandas as pd
import numpy as np
import matplotlib.pyplot as plt
import yfinance as yf

# Define the ticker symbols for NVIDIA and Tesla
tickers = ['NVDA', 'TSLA']

# Download the stock data from Yahoo Finance starting from 2024-01-01
start_date = '2024-01-01'
end_date = pd.to_datetime('today').strftime('%Y-%m-%d')

# Download the adjusted closing prices
stock_data = yf.download(tickers, start=start_date, end=end_date)['Adj Close']

# Calculate the daily returns
returns = stock_data.pct_change().dropna()

# Plot the cumulative returns for each stock
cumulative_returns = (1 + returns).cumprod()

plt.figure(figsize=(10, 6))
plt.plot(cumulative_returns.index, cumulative_returns['NVDA'], label='NVIDIA', color='green')
plt.plot(cumulative_returns.index, cumulative_returns['TSLA'], label='Tesla', color='red')
plt.title('NVIDIA vs Tesla Stock Returns YTD (2024)')
plt.xlabel('Date')
plt.ylabel('Cumulative Return')
plt.legend()
plt.grid(True)
plt.tight_layout()

# Save the plot to a file
plt.savefig('nvidia_vs_tesla_ytd_returns.png')
```

Make sure to install the packages in the environment where you run this script. Feel free to ask if you have further questions or issues!

--------------------------------------------------------------------------------
Executor:
[*********************100%***********************]  2 of 2 completed


--------------------------------------------------------------------------------
Assistant:
It looks like the data fetching process completed successfully. You should now have a plot saved as `nvidia_vs_tesla_ytd_returns.png` in your current directory. If you have any additional questions or need further assistance, feel free to ask!
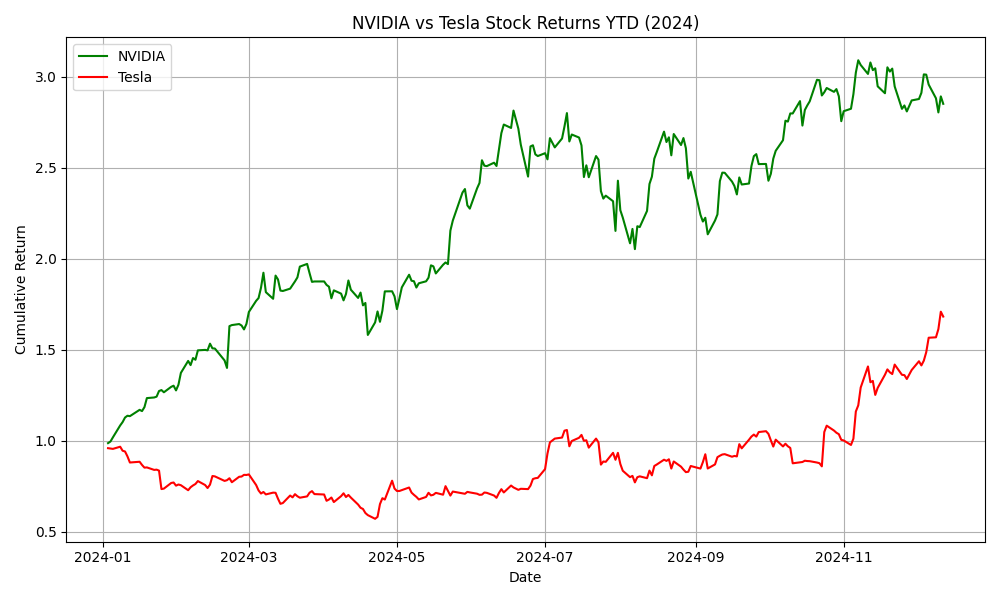
Aus der Ausgabe des Agenten können wir sehen, dass der Plot der Aktienrenditen von Tesla und Nvidia erstellt wurde.
from IPython.display import Image

Image(filename=f"{work_dir}/nvidia_vs_tesla_ytd_returns.png")  # type: ignore
AutoGen unterstützt auch eine verteilte Agent Runtime, die Agenten hosten kann, die auf verschiedenen Prozessen oder Maschinen mit unterschiedlichen Identitäten, Sprachen und Abhängigkeiten laufen.
Um zu erfahren, wie Sie Agent Runtimes, Kommunikation, Nachrichtenverarbeitung und Abonnement verwenden, lesen Sie bitte die folgenden Abschnitte nach diesem Schnellstart.